This is a follow up to my previous post, Travel Planning with AI.
One of my parting thoughts in that post is about travel budgeting and spreadsheets. Having a budget is important part of our travel decision-making. It helps us decide whether we could even afford the trip, or maybe we need to cut down on the number of travel days, things like that. The budget is also important to be tracked during the trip, to ensure we remain close to the budget and not overspend.
Sadly, so far all of my travel budgeting and financial info have all been in spreadsheets.
No More Spreadsheets
It me. The lady who’s been shouting “No More Spreadsheets” for the past year.
My current life ambition to be at Spreadsheet Zero. I’m even traveling to various conferences just to talk about No More Spreadsheets at PyCascades, LinuxFest Northwest, and PyCon US.
How could I still be telling people to ditch spreadsheets, when I myself still have a travel budgeting spreadsheet?
So, I need to practise what I preach, and be true to myself.
I started wondering, can I do budgeting and financing without spreadsheet?
If not spreadsheet, then what. Maybe I need some kind of an app. Can I incorporate it to this travel planning website, so that I have everything related to my travel in one place? Or do I need to build a separate app and expose some API endpoints?
I have a tendency to over-engineer things myself. So I decided to be more open-minded and started conversing with Claude.
The Iterative Claude Session
This whole process went through several rounds of prompting and reviewing.
You can see the full summary of all my prompts on the About page of the trip website. (Shown in the style of release notes, with “version” and “release date”).
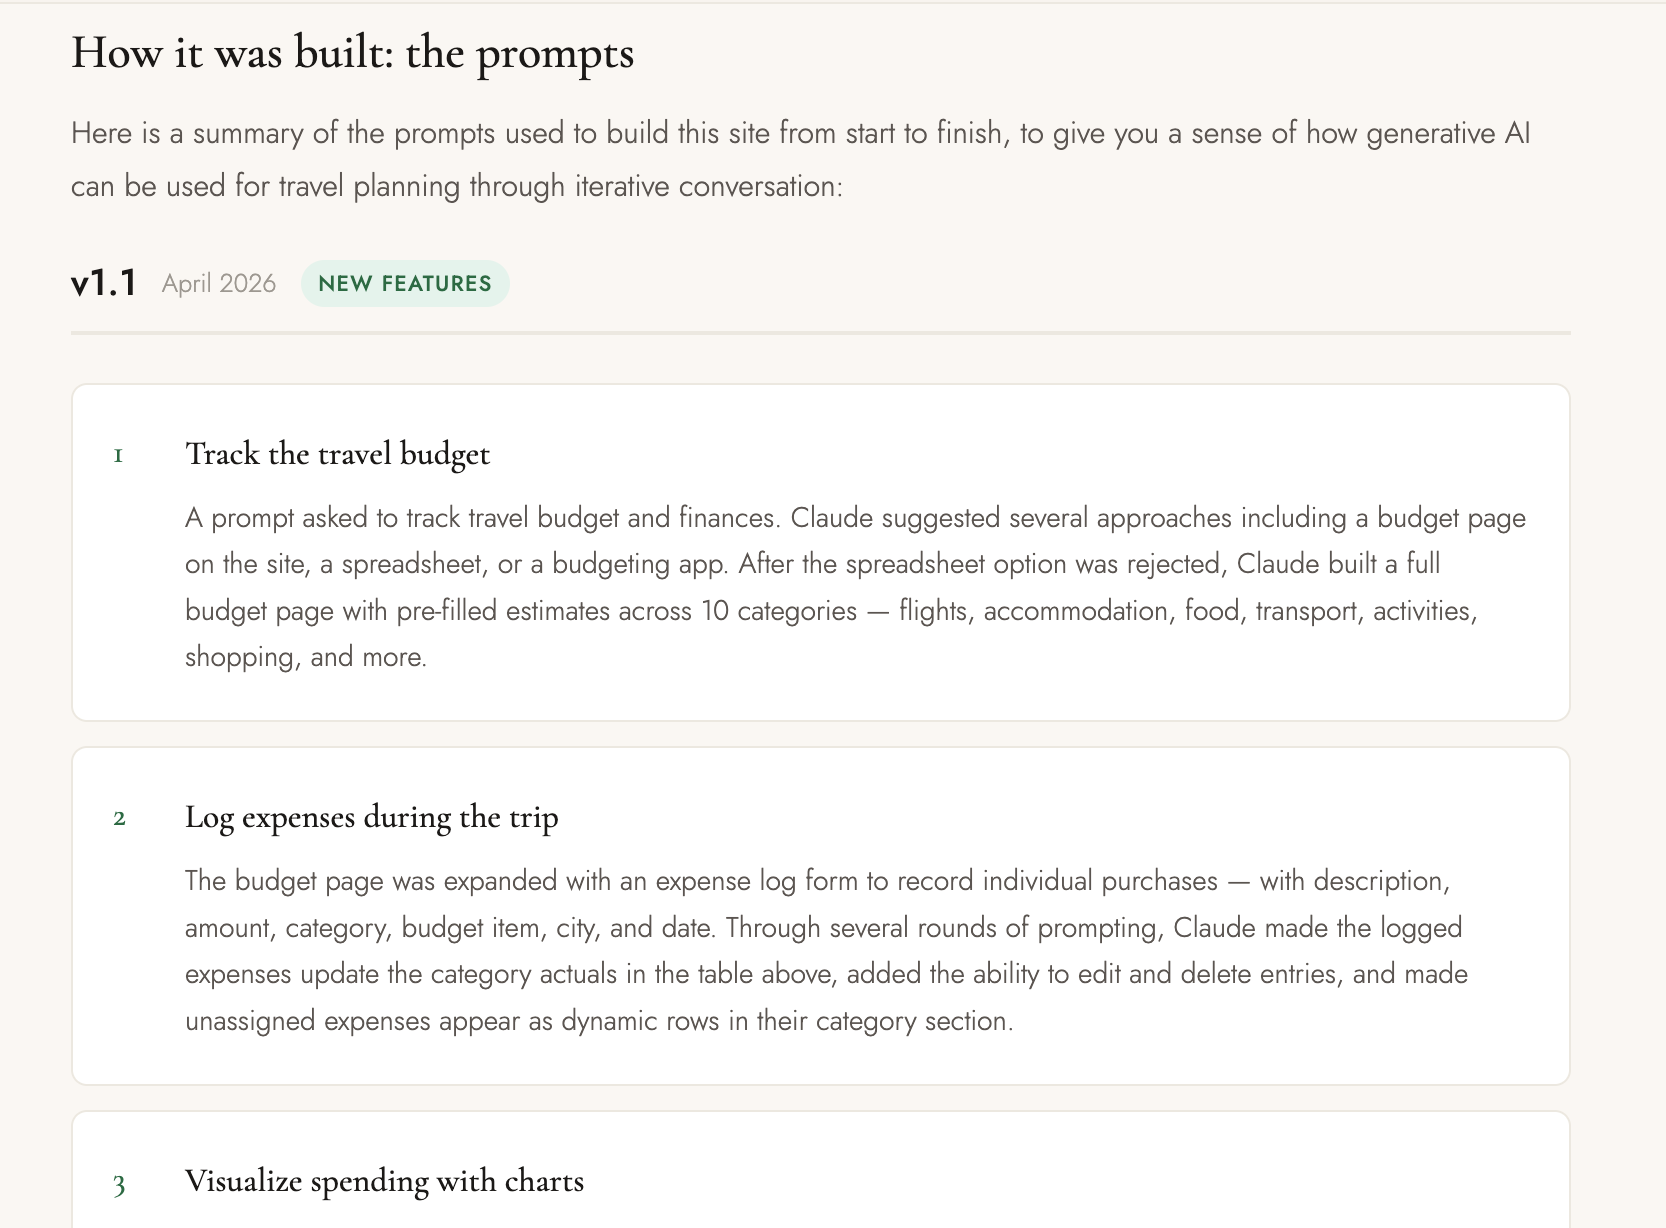
Step 1: Budget Tracking
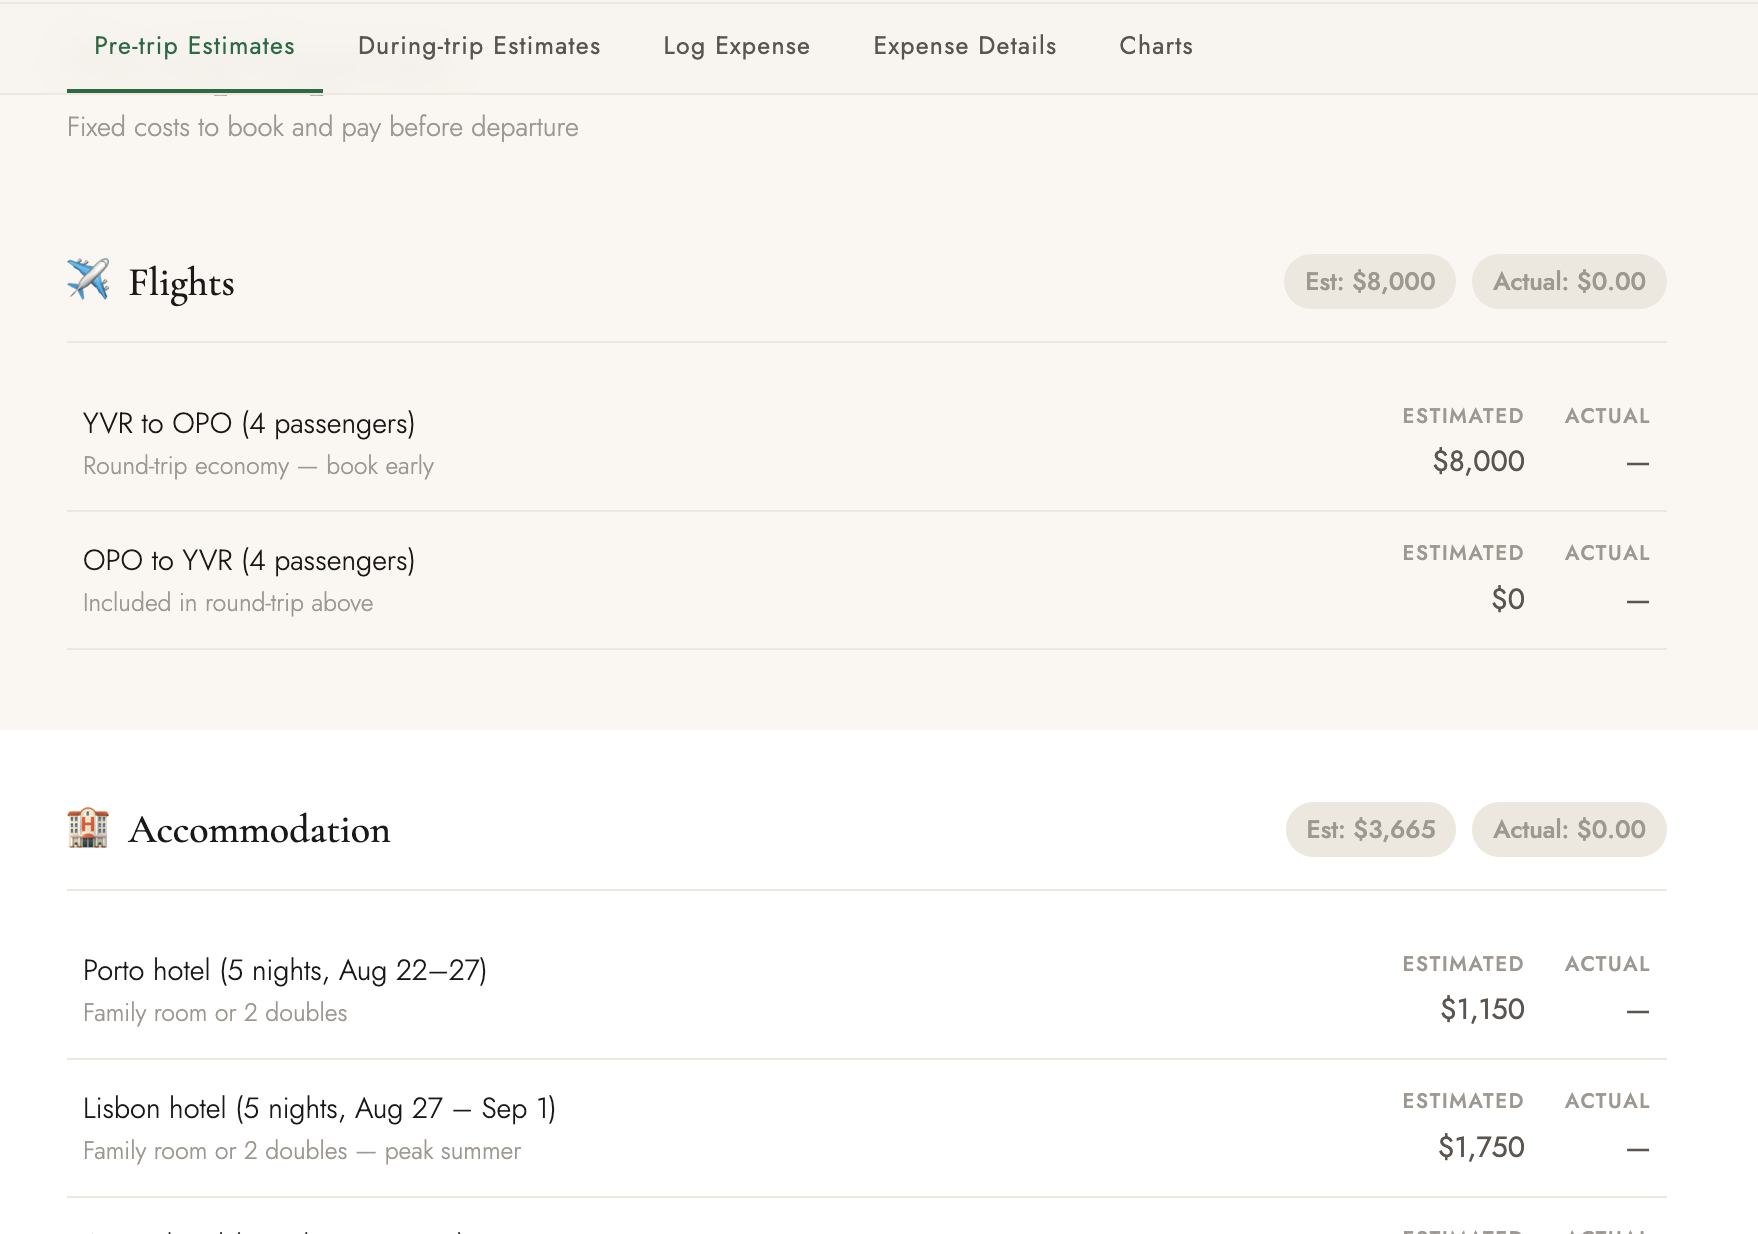
My first prompt was simply to “track the travel budget and finances.” Claude suggested multiple approaches and ended up building a budget page with pre-filled estimates across various categories like flights, hotels, food, activities, and transportation. The initial result was a clean summary table, already more visually appealing than those tiny cells in a spreadsheet. It came up with its own estimates about the costs, and taking into consideration my family structure of four people.
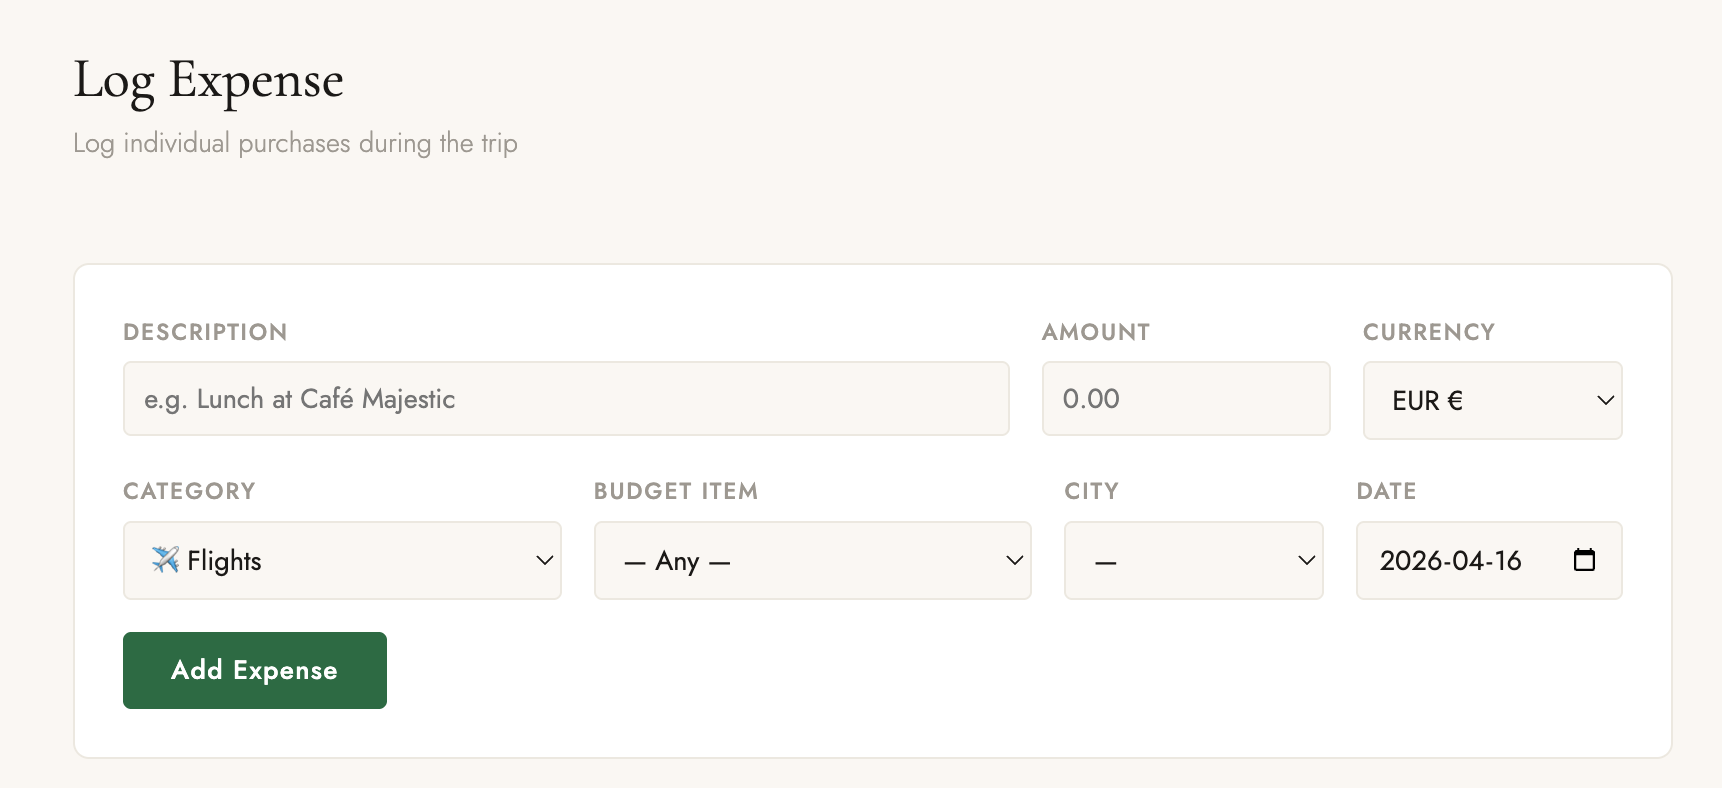
Step 2: Expense Logging
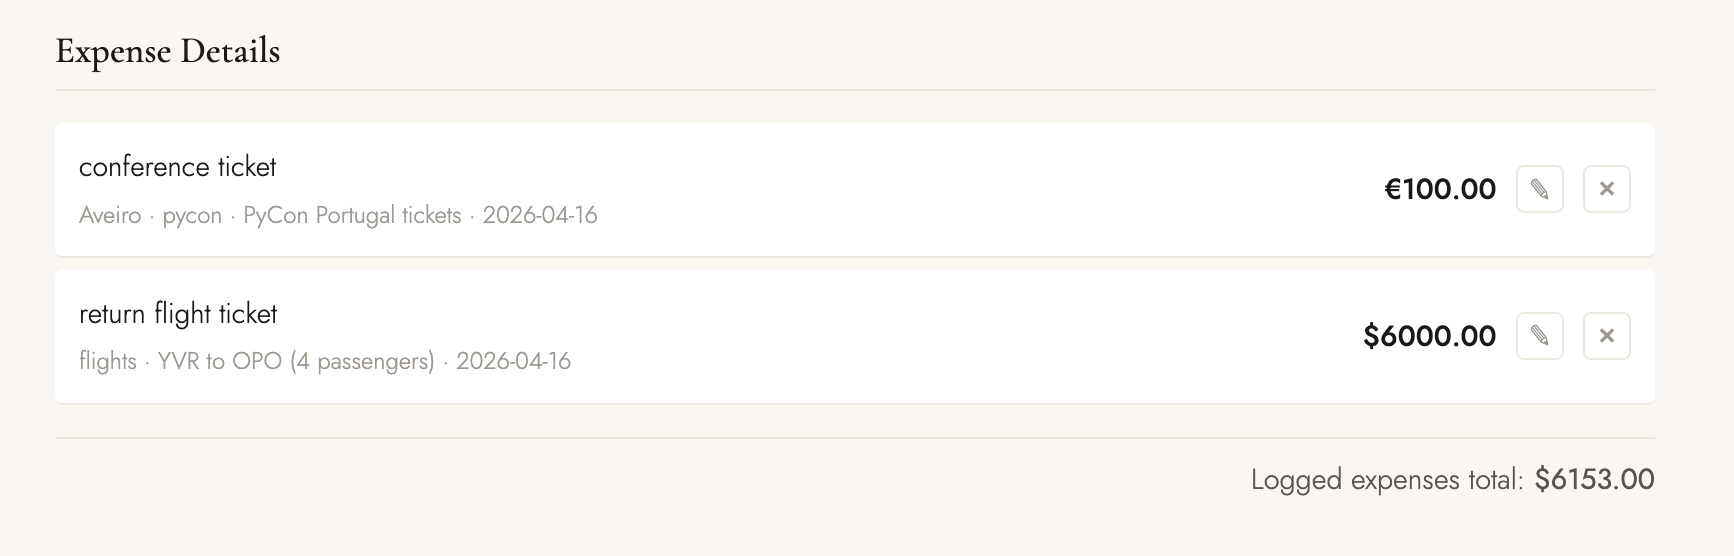
Next, I wanted a way to log actual expenses during the trip. Claude expanded the budget page with a form to record individual purchases, including fields for description, amount, category, budget item, city, and date, with real-time updates. This means I can log expenses on my phone while traveling, and the data stays in my browser via local storage. No backend. No login.
At first I was concerned because it means I could lose my data. But then again, I thought, maybe it is not a big deal. It’s not like I’m providing some service to anyone. I’m building this for myself. I have one phone, one laptop. I could test things on my laptop and when it is time to actually go to travel, I could enter my real expenses using my phone.
I realized that I appreciate not having to share my personal finances data with anyone. I own it. My data remains private to me. So this is actually a good thing.
I’m also aware that localStorage stores data as plain text and not encrypted. But I thought about what kind of data I’m actually storing: cost of flights, hotels, ice cream, conference tickets. All of these are kind of common knowledge. It’s not passwords, or phone numbers. Therefore, I’m ok with this tradeoff.
Step 3: Budget Visualization
I’m a visual person. Numbers are good but not enough. Charts and visualization helps seeing the big picture. From our experience building PyLadiesCon Conference Portal and Dashboard, I know well enough how seeing numbers represented with chars and colors are helpful. So I asked Claude to come up with visualization and charts.
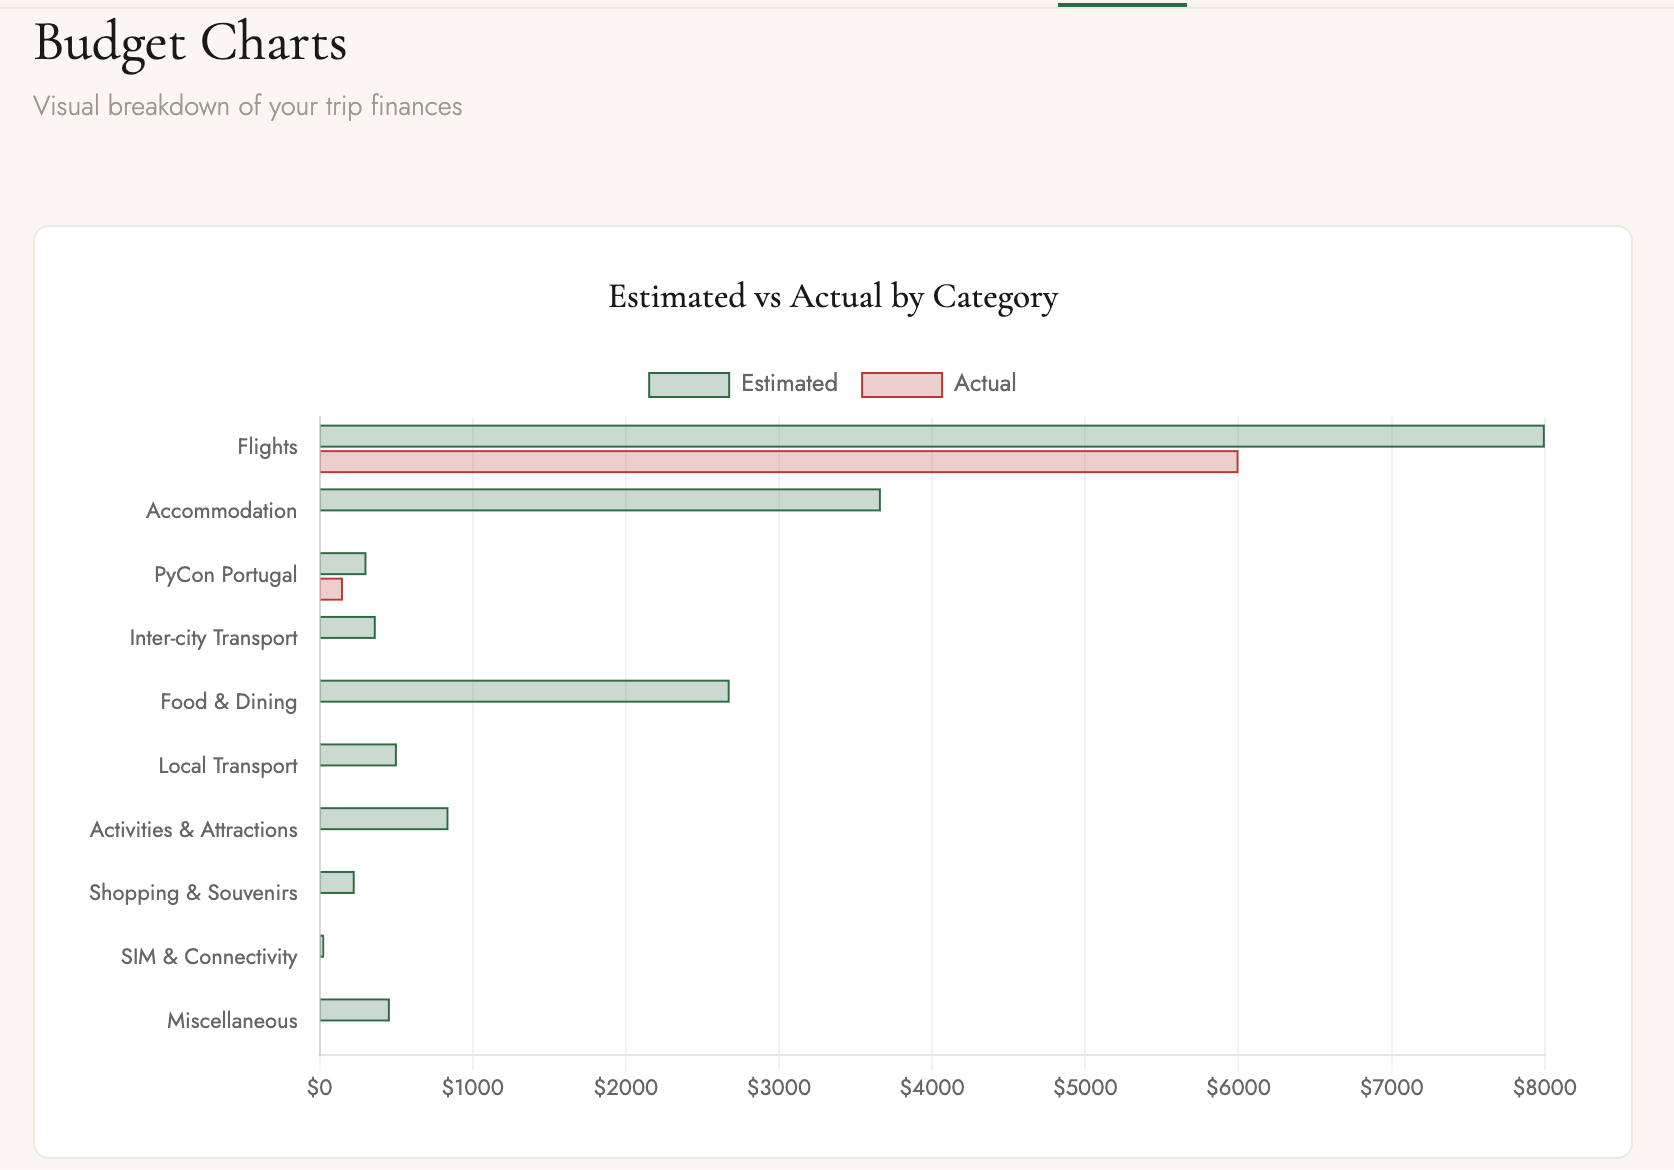
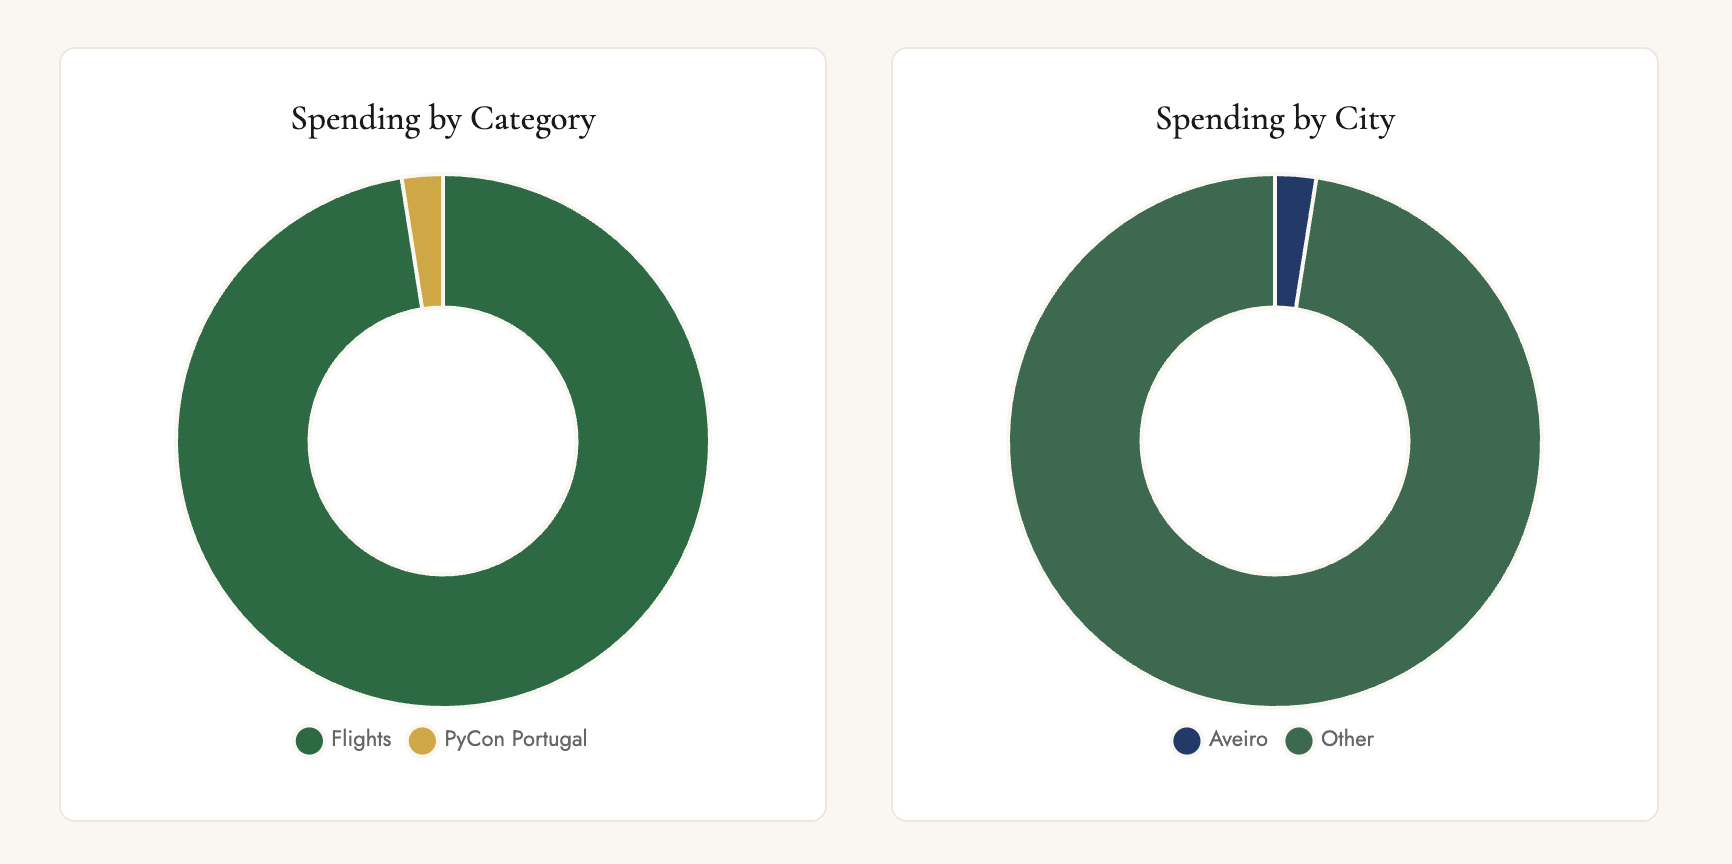
You know, even my spreadsheets are never this fancy. I never bothered creating charts or graphs for my own travel tracking spreadsheets. All I cared about was how much I spent. So I really appreciate being able to tell Claude to build up charts and visualizations without actually doing the chore work myself.
Step 4: Data Synchronization
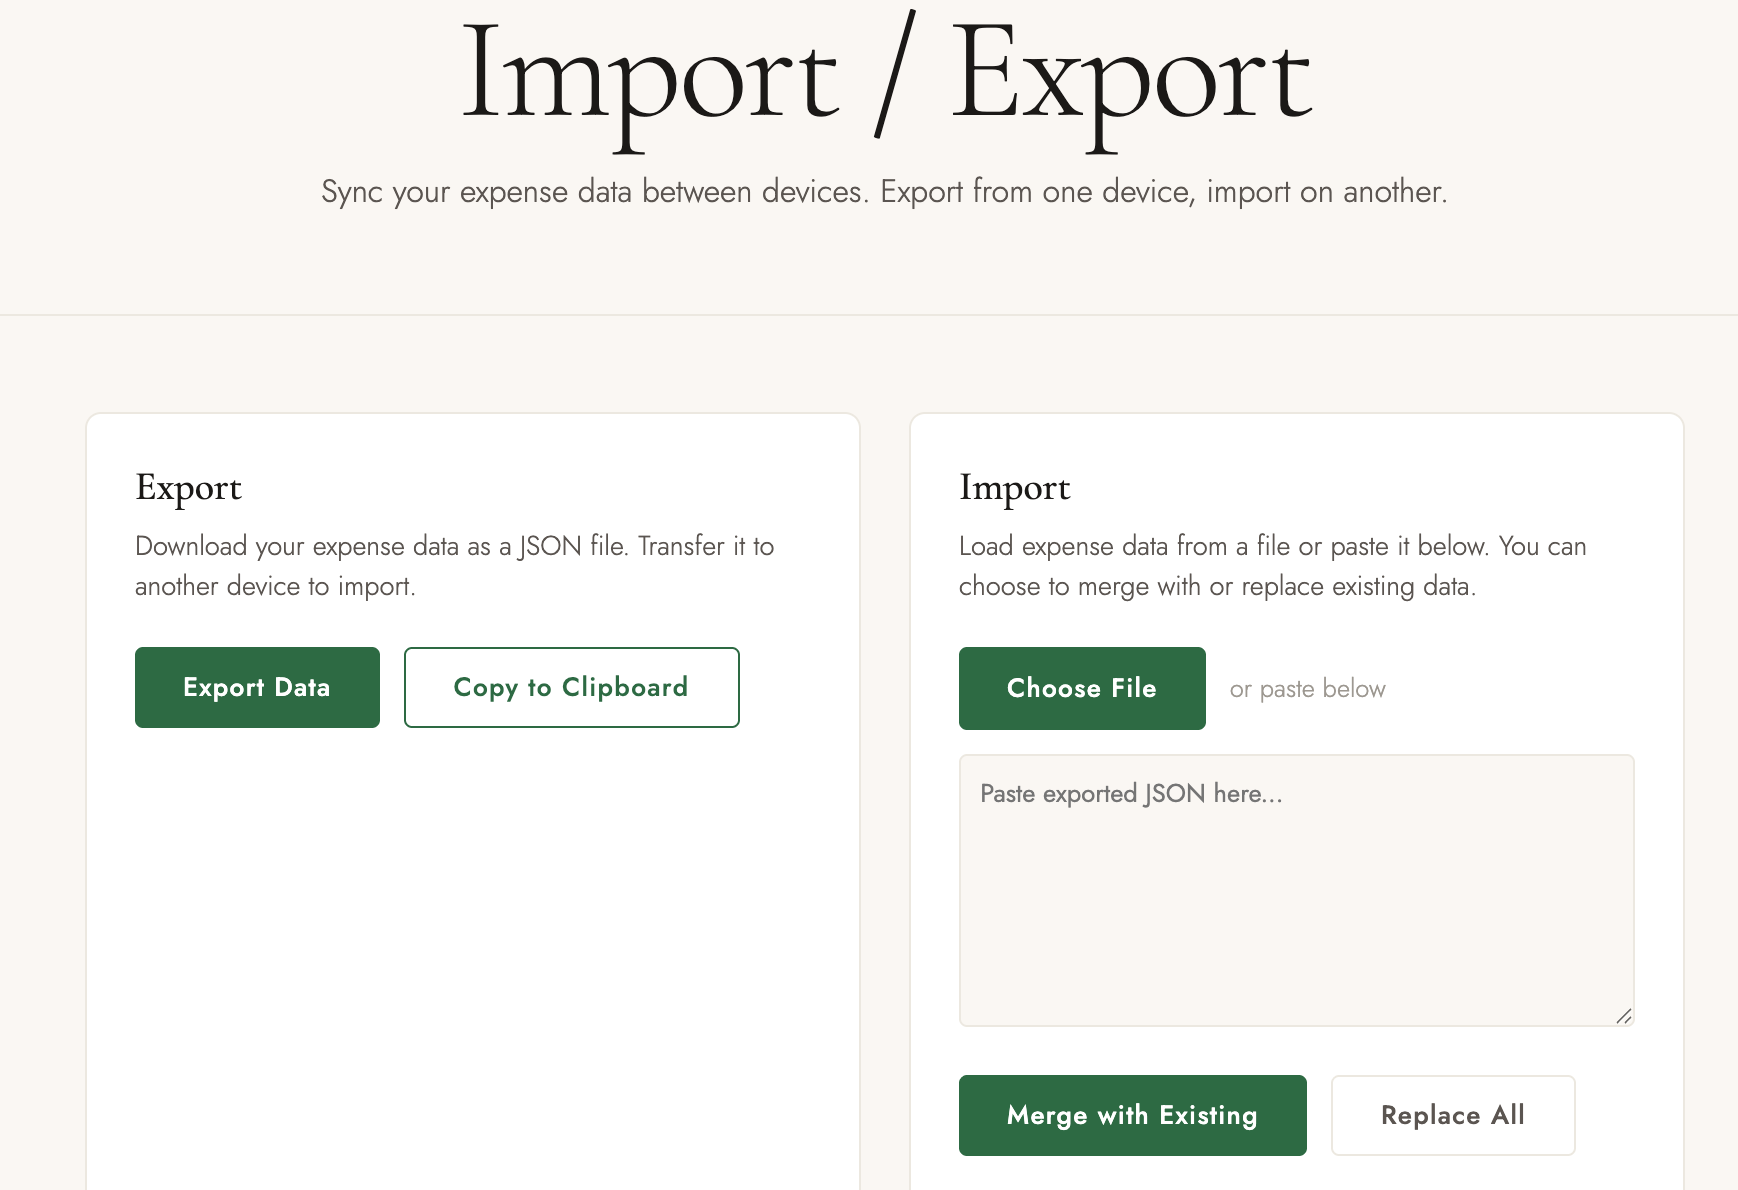
At this point I was already happy with the budget page. But something in me still wanted to somehow have data synced between my laptop browser and my phone. You can imagine me saying, “I should have started a Django web app for this!”. But I held back. Instead of instructing Claude to build a Django app, I simply asked it to provide options. It offered a few different ways to sync data, including a web backend choice, but it said it could also continue building it with localStorage, keeping most of the architecture in place. It offered a way to do an import/export as a way for me to transfer data between my laptop and my phone.
I thought, isn’t it tedious? But since I would likely do the import export just once or twice, and once I started traveling I wouldn’t be using my laptop and will be on my phone most of the time, I thought maybe it’s not such a bad idea. Perhaps by being able to import/export, it gives me a way to have a backup, and if ever need to, I could even export the data into spreadsheet. (I won’t).
Step 5: Progressive Web App
At this point, I have a working budget and expense page, and the ability to sync data between my laptop browser and my phone browser. I started wondering, what if it is a mobile app? Is it even possible? What would it take? I actually have no idea at all. I have never developed a mobile app before.
I asked Claude to simply show me, what would it take to create a mobile app.
It gave some suggestions, including a PWA or a native app, even describing the cost needed to maintain these different options. I had no idea at all, so I went along with the PWA suggestion for the light-weight option. And again, all of this only considering that I’m the primary user.
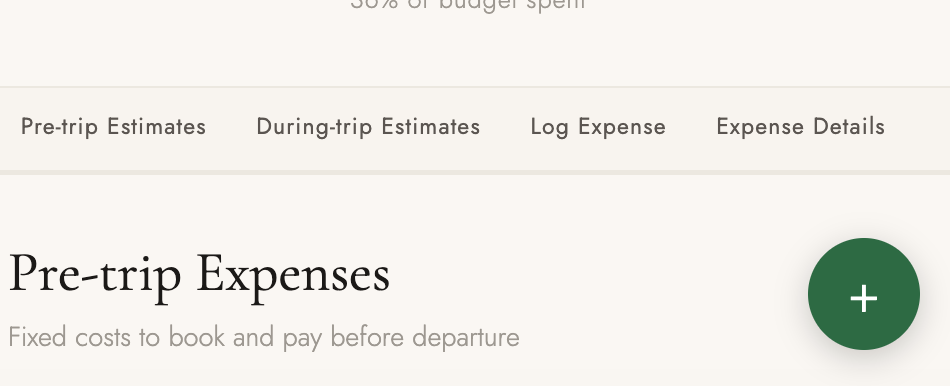
Step 6: Quick Expense Logging Page
After it built the PWA, I tried it on my phone. But then I realized that now the budget page is too lengthy to scroll on the phone. Also I realized that even though during planning time I would be reviewing the budget page often, during travel time, I would likely just need to log my expenses more often. So I asked Claude to consider the two scenarios. At first it simply suggested adding a floating “add” button on the mobile version. However, I thought about it, then I instructed it to actually create a separate expense logging page, and to only add the floating “add” button to the budget page.
Now that I’m splitting the expense logging form to a separate page, I also prompted it to extract out the Import/Export section into a separate page.
Step 7: Multi-Currency Support
Since the site was initially built for traveling to Portugal, Claude had initially display all the currency in Euro. However, I mentioned that as a Canadian, Canadian dollars is a currency that works better for my brain. I will be entering expenses in Canadian dollars during planning time, but during travel time, I will be entering my expenses on the go in Euro. So I asked Claude to present me some options on how to best handle this.
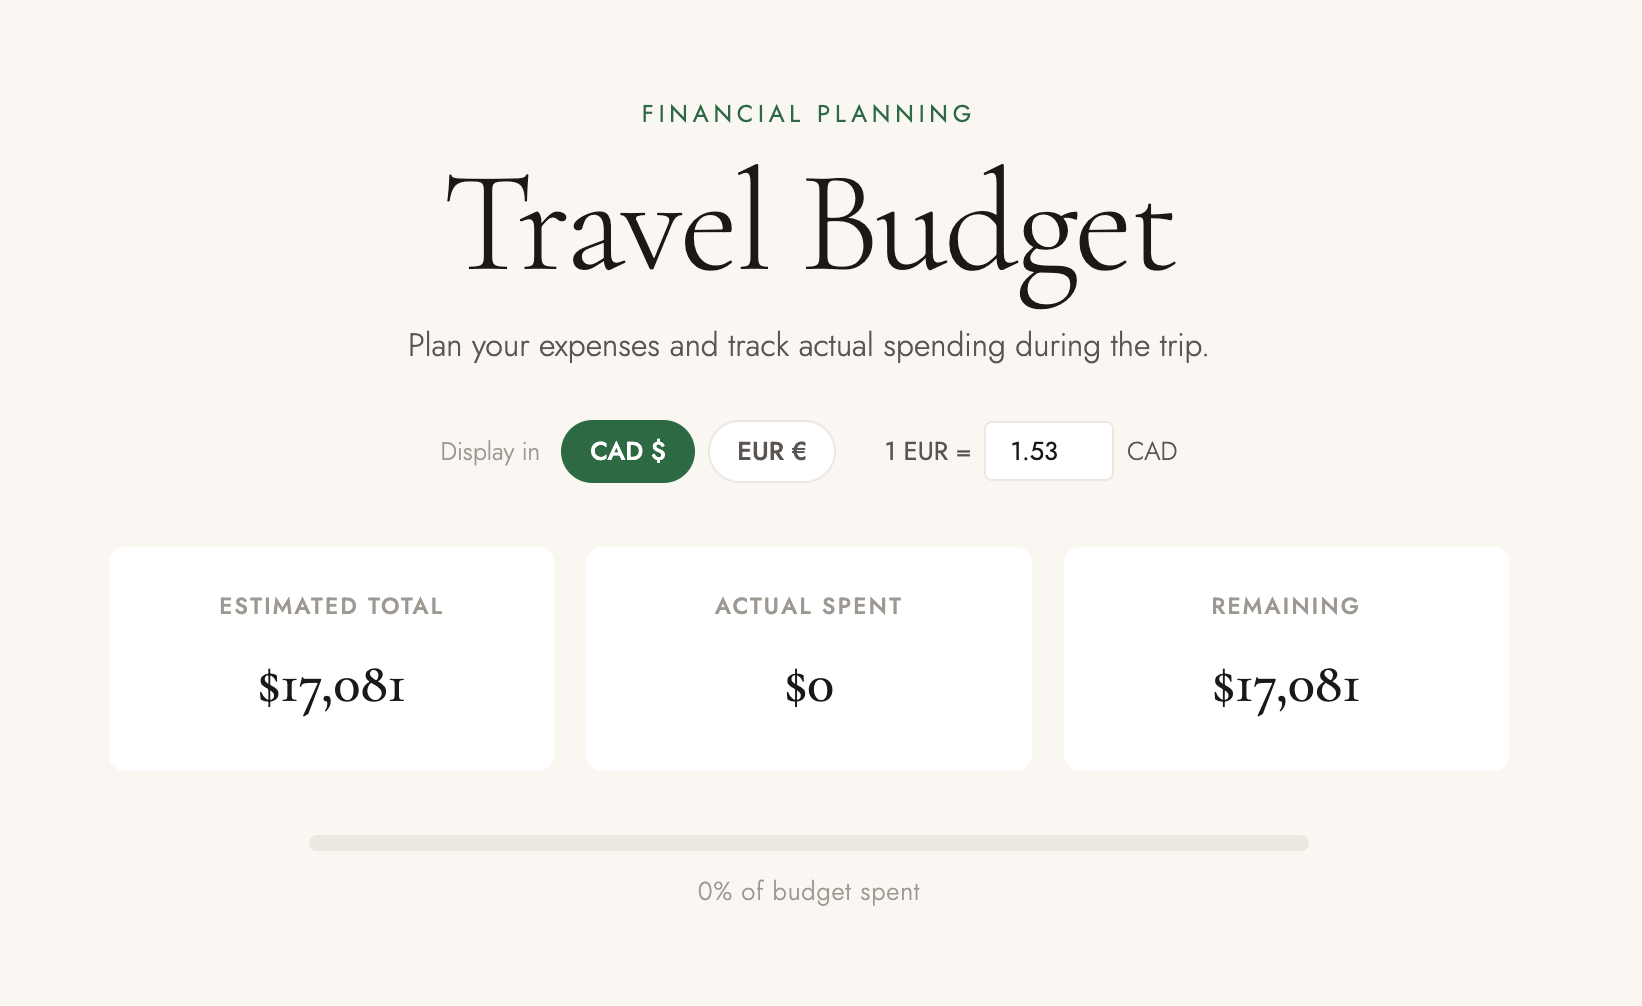
Claude suggested a few different approaches, including having a toggle to switch between currencies, or even showing both currencies side by side. I went with the toggle option and still told it I want an easy way to manually adjust the currency rate.
Step 8: Personal Branding
After I was satisfied with what it built, I decided to add in my own personal branding, to make it obvious that this is a personalized travel app for me. I asked Claude to incorporate my own logo from my main website. It gave several suggestions, and I chose its suggestion to add a split line with the Portuguese flag color into my monogram.


Budgeting with an App instead of Spreadsheet
There is one reason we’ve been using spreadsheets for things: it is easy enter data in tabular format. In a spreadsheet, you can easily add numbers into cells, create formulas, make calculations, and so on.
But now, I don’t have spreadsheet. How do I fiddle with the numbers?
For example, in the initial budget that Claude came up with, I noticed that it overestimated the flight cost. It also came up with expenses like travel insurance, which I don’t need (I have travel insurance through my credit card.)
If this was a spreadsheet, I could go into the cell and edit the number or delete the row.
But I would argue though, finding the right cell or row to edit in Spreadsheet can be a challenge too. Especially it involved other columns in a row. If you’re not careful in deleting the row or column, you might mess up the rest of the data and the formula and calculations. IYKYK.
Also, entering data in spreadsheet on your phone is hard. The cells are so tiny, and you have to scroll around to find the right cell.
Well now I don’t even have a spreadsheet. I have a codebase in git. It’s complicated enough that I need to open in an IDE. Isn’t it tedious having to search through the codebase to find the right file and line to edit?
Maybe if I had written the code by hand. Remember, I actually wrote no code. In this style, I don’t even have to do my own ctrl-f to find the text to update.
I prompted Claude and tell it to “Reduce the flight cost to X” and “Remove travel insurance fee”. I only need to reload the webpage on the browser to see the new budget calculations.
Check it out
If you’re curious to see my personalized travel plannig and budgeting app, check it out at my Portugal trip website.
Thoughts
I’m glad I didn’t simply asked Claude to “create a budget for me”, or “estimate my travel spending”. Because, I think, if I did that, it might present just a readonly html text file with information.
I think it was good that I was specific in telling it that I wanted an “app”, where I could still adjust the numbers and enter my own real expenses, so now it actually creates a form with textboxes so I still get to do my own data entry.
I like that it came up with pretty detailed travel expenses and estimate, some of these I wouldn’t even thought of doing, but now that I see them, it makes sense. I like that I could still instruct it to tweak the numbers to fit my own needs and travel style.
I started with thinking, I wanted the “no spreadsheet” travel planning and budgeting experience. But what I got is not only “no spreadsheet”, but also “no password”, “no login”, “no cookie”, “no tracking”, “no docs”, “no ads”, and yet, functional.
I’m never planning my travel with docs and spreadsheets again.
What’s Next?
So, is the app helping me to convince my family to go to Portugal?
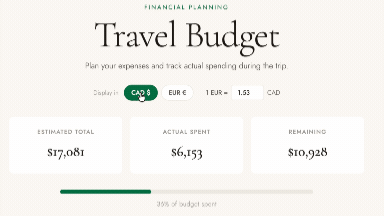
You see, the budget estimated by Claude is pretty steep 😥 It estimated that for the family of 4, 14 days of travel spanning 3 cities in Portugal would cost 17,000 CAD 😵 That’s way more money than what we’re willing to spend. So if I were to present this to my family right now, it would give them even more reason not to go 😥
So I still need to tweak the numbers. I need to verify if the budget is real or just hallucination. I want to see how we could cut it even further (by at least 30-40% 😭).
But the app really is helping me with planning and decision-making. Now I could see clearly which dates I should book my travel, how much things are going to cost, what activities we might not want to do, and so on.
Now that I have a nice travel planning app for Portugal, I started thinking, can I do the same for other travels? Can I build a travel budgeting app for Taiwan, which is where my family wanted to go to. Maybe I could compare the budget and activities for the two countries?
Should I create this for my travel to PyCon US in Long Beach? To LFNW in Bellingham? To Python core sprint in SFO? Wouldn’t it be fun to have an individually personalized travel website built just for myself and fitting my travel style.
Maybe when I hear about a new conference and deciding whether to go for it or not, I could tell Claude to build up the page along with fun travel activities and the budget, and then I could make my decision from there.
Maybe if I ever need to justify conference travel to the bosses, instead of creating a doc or a presentation slide, I could just point them to my travel site?
What about instead of entering expenses by hand, I could just take a photo of the receipt and populate things immediately? Hmm I wonder how that could work.
What about travel expense tracking with a group of people? For example, when traveling with close friends and family, sometimes we’d be booking the same activity, one of us would make the booking for the whole group, and ask the others to pay. Sometimes one of us would pay for the meal first and the others would repay by electronic transfer later on. How to keep track of this? Spreadsheets? 💀
These are all great questions to ask Claude Code next time.